When I show my work at exhibitions and art fairs, by far the question I am asked the most is, “How did you do that star trails shot?”. It’s not always phrased that way. Sometimes I get “Is that real?”, or “What is that”, or “Does that really happen?”. “That’s taken in daytime, right?”. Well, it’s time I give you the basics about shooting star trails, and anyone who wants more detail can join me on a late night shoot up at Mount Rainier.
First of all, what are star trails? No, we’re not talking about the exhaust left by quickly accelerating quasars. We all know that as the earth spins, stars appear to move from east to west just like the sun. Back in the days before digital photography, you could set up a film camera on a tripod on a clear night in an area without much light pollution, point it at the sky, and using a device known as a cable release, hold the shutter open for as long as you wanted. When you developed your film or got it back from the lab, you would see streaks made by the stars due to the earth’s rotation. Whether the film was correctly exposed or not was another matter. You wouldn’t know for certain until the film was developed, and more than likely you’d have to head back and try again with different camera settings. In any case, it takes a while for enough motion to occur to create streaks, so this is a phenomenon that is unique to photography – you are not going to see this with the naked eye – ever. Does that make it not real? I don’t think so.
It turns out that if you follow a line from the North Pole straight up to a point known as the North Celestial Pole, you will come within about one degree of a rather mediocre star known as Polaris. (I wonder how it got that name.) Anyway, from the Northern Hemisphere, other stars appear to circle Polaris. (You folks in the Southern Hemisphere will have to deal with a very faint star in the constellation Octans. Sorry about that.) So, if you were to include Polaris anywhere within the view of your lens, over time other stars would appear to circle it. I think photographers get extra bonus points for doing this.
Well, digital photography has changed things a bit. In one sense it has made it harder, and in another it has made it easier. It’s made it harder because all of the electronics involved in digital photography needs battery power to operate, unlike the manual film cameras that existed in the past. This means that trying to take a single exposure of, say, six hours of star spin could end in complete failure if your camera, even fully charged, could not keep the shutter open for six hours. And it probably can’t. It would shut down and you might not get anything at all on your memory card, and your night would be wasted. Unless you met an interesting wild animal. But there’s also good news. Because of digital post-processing using tools like Adobe Photoshop, it is now much easier to take a bunch of shorter duration images and combine them into a single image that appears to have been take over many hours. And that’s how I do it.
So here’s my basic workflow. First you need to find a suitable foreground. Yes, it’s a fact that images of the sky look better with an interesting earthbound object (unless you’re using a powerful telescope, but that’s a completely different matter). I personally believe the earthbound object needs to be lighted somehow, but sometimes silhouettes work. If it’s a nearby object such as a tree, you can light-paint it with a flashlight or electronic flash. If it’s a faraway object such as a mountain, you’ll need the moon. So get out your moon charts.
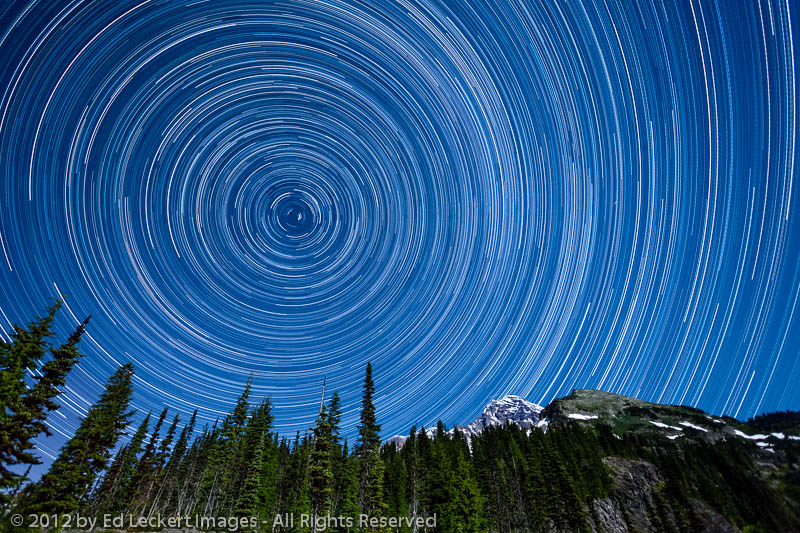 Next you need to figure out what exposure works for the foreground. For example, if it’s a mountain scene lighted by the moon as in my “Star Trails above Mount Rainier and Pyramid Peak” above, take some test shots and check the image and histogram on your LCD screen for proper exposure of the foreground. (This is the biggest advantage over film – instant feedback.) Once you have the right settings, you just need to do that over and over, essentially until the battery dies. To do that, you’ll need to have an intervalometer, a programmable timer and “cable release” combined into one. You program the timer to repeatedly take the same exposure over and over, and you crawl in your tent and go to sleep. Whether your exposure is 15 seconds or ten minutes doesn’t matter much as far as the stars are concerned. As long as your exposures are taken more or less back to back, when you combine them you’ll have continuous trails.
So that brings us to the final steps – postprocessing. I use software called Adobe Photoshop Lightroom, so I use that to adjust the first image the way I like it for color balance, contrast, saturation, and the like. Then I apply these settings to the entire set of images and send them over to Photoshop as layers where I set the blending mode of each layer so they’ll all show through. Finally, I send the finished work back to Lightroom.
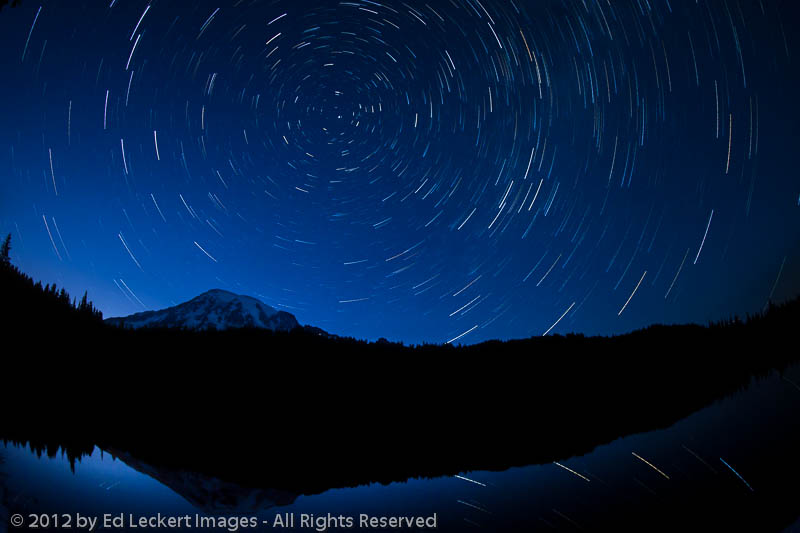 Simple, right? Yeah, I know. Lost you at cable release. Well, don’t worry. This is one of the more complex types of images, and it takes some knowledge of various technologies and some experience to master. But that’s why I’m here – so you don’t have to hang out in the middle of the night with bears and mosquitoes and learn all of this minutia to get the shot.
So the next time you see a beautiful star trails image, don’t worry too much about whether it’s “real” or how it was done. Appreciate it for what it is, another example of the beauty that surrounds us on this amazing rock we call Planet Earth.

Beautiful! Thanks for the info.